


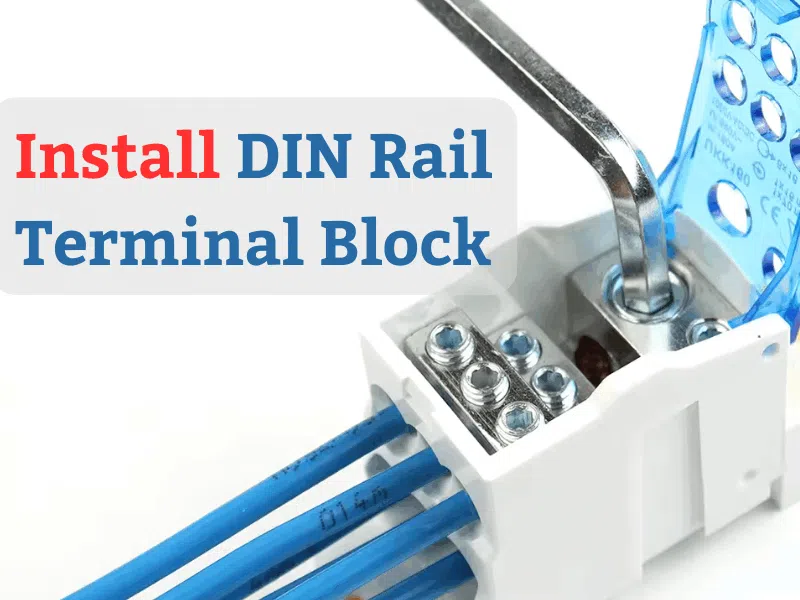
What Is a UKK DIN Rail Terminal Block?
A UKK DIN rail terminal block is a compact modular power distribution device designed for one-input and multiple-output current branching inside control panels. It combines high-current capacity with easy installation, supporting both DIN35 rail und M5 screw mounting options.
The UKK series typically includes models from 80 A to 500 A, featuring a copper alloy busbar and flame-retardant PA66 housing for high safety and mechanical durability. These blocks are ideal for automation, machinery, and energy systems where efficient power distribution is required.
Find matching accessories in our Power Distribution Product Line.
Why Choose DIN Rail Mounting for Power Distribution?
DIN rail mounting is one of the most efficient and standardized methods for installing terminal blocks. It ensures easy positioning, vibration resistance, and flexible maintenance — especially in complex control systems.
Advantages of DIN Rail Mounting:
- Quick installation: The clip-on mechanism allows fast attachment without extra brackets.
- Stable connection: The rail provides mechanical support, ensuring no terminal displacement under heavy load.
- Unified modularity: Compatible with relays, breakers, and power modules on the same rail.
- Vereinfachte Verkabelung: Uniform cable routing reduces wiring clutter.
Durch die Verwendung von M5 screw fixing, the connection between the copper busbar and conductor remains firm and conductive even under temperature fluctuation.
Step-by-Step UKK DIN Rail Distribution Block Installation Guide
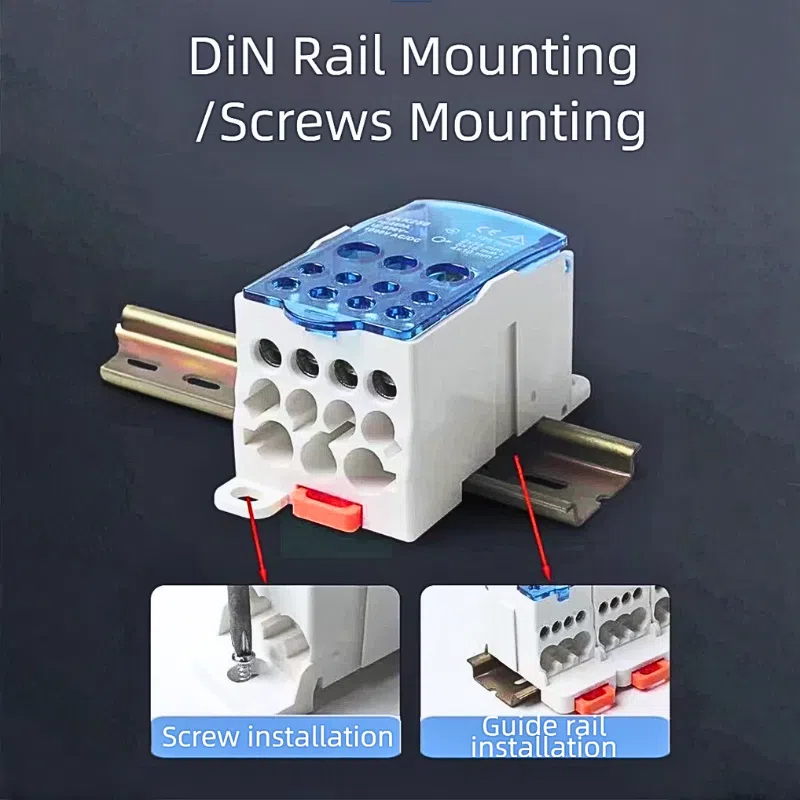
A successful UKK terminal block installation has two common methods: DIN rail (snap) mounting and M5 screw mounting. For both, proper safety and sequence are critical.
A. DIN Rail (Snap) Mounting Method
- Vorbereitung:
- Turn off all power to the cabinet.
- Gather terminal blocks, 35mm DIN rail, screwdriver, wire stripper, and measuring tape.
- Confirm block compatibility with the rail and current/voltage specs.
- Install the DIN Rail:
- Mark mounting points in the cabinet.
- Position the DIN rail horizontally.
- Fix with screws or mounting clips.
- Mount Terminal Blocks:
- Align block with the rail notch, keeping ID face visible.
- Press the block onto the rail until it snaps securely.
- Space blocks evenly; use end plates to prevent side shift.
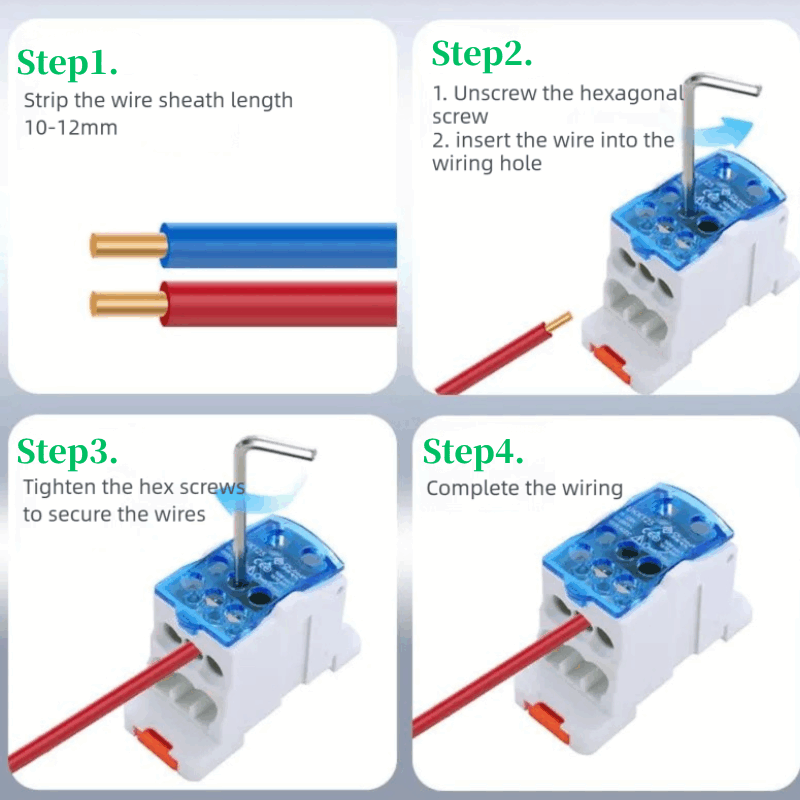
- Wiring:
- Strip the conductor to proper length.
- Insert bare wire fully into the terminal.
- Tighten the screw with a torque screwdriver (per datasheet: e.g., 1.2–2.5Nm).
- Tug-test each connection, add ferrules for stranded wire.
- Repeat:
- Continue until all desired blocks and wires are installed.
- Finish and Inspect:
- Add transparent cover for safety.
- Label each circuit (use marking tags).
- Double-check torque and wire seating.
- Re-energize and visually monitor for heat or loose ends.
B. M5 Screw Mounting Method
Some UKK blocks may require direct mounting via M5 screws:
- Mark and pre-drill panel holes.
- Insert screws through block base into the cabinet or plate.
- Tighten until snug—do not overtighten to avoid plastic deformation.
- Follow steps 4–6 above for wiring, labeling, and inspection.
Recommended Tools and Wire Specifications
Proper tools and wire selection are crucial for both safe installation and long-term reliability.
| Tool | Funktion | Note |
| Torque wrench | Tighten screws to spec | Avoid over-torque |
| Wire stripper | Remove insulation | Strip length 8–12 mm |
| Multimeter | Verify continuity | Test before energizing |
| Label printer | Tag wires | Maintain organization |
Wire Guidelines:
- Input wire size: 10–50 mm² (depends on model)
- Output wire size: 5–16 mm²
- Material: copper, ferruled preferred
- Insulation temperature: –40 °C ~ 105 °C
Inspection and Maintenance After Installation
Routine checks and simple maintenance steps can prevent failures:
- Monthly: Inspect for loose screws, stray wires, and discoloration.
- Quarterly: Retighten terminal screws with a calibrated torque driver.
- Yearly: Clean dust and debris, replace cracked covers, and check for corrosion.
- Any time: If abnormal heating or arcing appears, immediately de-energize and recheck all terminals.
If you need technical help, seek advice from the supplier or contact the technical team page for troubleshooting or onsite support.
FAQ – UKK DIN Rail Mounting Installation
A1: Basic hand tools like screwdrivers are sufficient, but a torque wrench is strongly recommended for reliable, safe installations.
A2: Refer to the block’s datasheet; typically, use 1.2–2.5Nm for medium-sized models. Proper torque prevents loose connections and heat build-up.
A3: Yes, when installed correctly and periodically retightened, they deliver excellent vibration resistance and long-term reliability.
A4: Immediately shut down power, retorque all screws, check for damaged insulation, and replace faulty blocks if necessary.
Schlussfolgerung
Installing a UKK DIN rail terminal block is straightforward when the correct tools, wire sizes, and torque values are followed. Whether you use DIN rail clip mounting for flexibility or M5 screw fastening for extra strength, the result is a clean, secure, and professional power distribution layout.
By combining certified materials, proper wiring discipline, and periodic maintenance, your UKK installation will deliver long-term safety and reliability in industrial automation, energy, and control systems.